Saturday, 18 May 2013

How To Add 3D Rotating Menu In Blogger | Nairotech


 Today, we gon be dishing out a very lovely tutorial on Navigation (Horizontal) menu. After lots of discoveries we packaged this to suit every blogger template which doesn't need a Javascript or Javascript to function. It only needs Html and Css. You might also want to check our previous post on  How To Edit Your Blog Easily With The New Blogger Template Editor
Steps To Add The Widget To Blogger 

Go to your Blogger dashboard
Click Template >> Edit HTML
Then  find ]]></b:skin> Paste the below code just before ]]></b:skin>
        /* 3d Flipping Menu By Nairotech.com */
        .block-menu {
            display: block;
            background: #000;
        }

        .block-menu li {
            display: inline-block;
        }

        .block-menu li a {
            color: #fff;
            display: block;
            text-decoration: none;
            font-family: 'Passion One',Arial,sans-serif;
            -webkit-font-smoothing: antialiased;
            -moz-font-smoothing: antialiased;
            font-smoothing: antialiased;
            text-transform: uppercase;
            overflow: visible;
            line-height: 20px;
            font-size: 24px;
            padding: 15px 10px;
        }

        /* animation domination */
        .three-d {
            -webkit-perspective: 200px;
            -moz-perspective: 200px;
            perspective: 200px;
            -webkit-transition: all .07s linear;
            -moz-transition: all .07s linear;
            transition: all .07s linear;
            position: relative;
        }

            .three-d:not(.active):hover {
                cursor: pointer;
            }

            .three-d:not(.active):hover .three-d-box,
            .three-d:not(.active):focus .three-d-box {
                -moz-transform: translateZ(-25px) rotateX(90deg);
                -webkit-transform: translateZ(-25px) rotateX(90deg);
                -o-transform: translateZ(-25px) rotateX(90deg);
                transform: translateZ(-25px) rotateX(90deg);
            }

        .three-d-box {
            -webkit-transition: all .5s ease-out;
            -moz-transition: all .5s ease-out;
            -ms-transition: all .5s ease-out;
            -o-transition: all .5s ease-out;
            transition: all .5s ease-out;
            -webkit-transform: translatez(-25px);
            -moz-transform: translatez(-25px);
            -o-transform: translatez(-25px);
            transform: translatez(-25px);
            -webkit-transform-style: preserve-3d;
            -moz-transform-style: preserve-3d;
            -ms-transform-style: preserve-3d;
            -o-transform-style: preserve-3d;
            transform-style: preserve-3d;
            pointer-events: none;
            position: absolute;
            top: 0;
            left: 0;
            display: block;
            width: 100%;
            height: 100%;
        }

        .front {
            -webkit-transform: rotatex(0deg) translatez(25px);
            -moz-transform: rotatex(0deg) translatez(25px);
            -o-transform: rotatex(0deg) translatez(25px);
            transform: rotatex(0deg) translatez(25px);
        }

        .back {
            -webkit-transform: rotatex(-90deg) translatez(25px);
            -moz-transform: rotatex(-90deg) translatez(25px);
            -o-transform: rotatex(-90deg) translatez(25px);
            transform: rotatex(-90deg) translatez(25px);
            color: #FFE7C4;
        }

        .front, .back {
            display: block;
            width: 100%;
            height: 100%;
            position: absolute;
            top: 0;
            left: 0;
            background: black;
            padding: 15px 10px;
            color: white;
            pointer-events: none;
            -moz-box-sizing: border-box;
            box-sizing: border-box;
        }

Save  Template

NOW,
Head straight to Layout in your Blogger Dashboard >> Select a Gadget (Blog  header section)
Then Select JavaScript/HTML  & paste the below code.

<ul class="block-menu">
<li><a href="#" class="three-d">
Home
<span class="three-d-box"><span class="front">Home</span><span class="back">Home</span></span>
</a></li>
<li><a href="#" class="three-d">
About<span class="three-d-box"><span class="front">About</span><span class="back">About</span></span>
</a></li>
<li><a href="#" class="three-d">
Services
<span class="three-d-box"><span class="front">Services</span><span class="back">Services</span></span>
</a></li>
<li><a href="#" class="three-d">
Blog
<span class="three-d-box"><span class="front">Blog</span><span class="back">Blog</span></span>
</a></li>
<li><a href="#" class="three-d">
Create this
<span class="three-d-box"><span class="front">Create this</span><span class="back">Create this</span></span>
</a></li>
</ul>

Change the highlighted section above
Save.

Like our Facebook Fanpage Here: http://www.facebook.com/nairotech


Thursday, 16 May 2013

Download LiveProfile On your Device, A New Pinging App


Since the emergence of Blackberry Messenger, we've have had several chatting and social applications competing to gain the number one spot. But, its petinent that that the blackberry service still rocks best. Just of recent i had that Blackberry Messenger will likely be made available in our favourite online stores for download on Andriod and Ipones. 

Several of my friends that nursed the thought of selling their Andriod phones to get a Blackberry phone just started nursing a different feeling because Andriod OS is very good with lovely and more Advanced features... I'm sure we all have heard of Whatsapp which was later bought by Google.

We have the likes of 2go messenger, Mozat e.t.c. but, today we will be reviewing a very nice Chat messenger called  LiveProfile


LiveProfile is as good as BBM & is portable for all Platforms like: Andriod, Blackberry, Ipad and Iphone. You can communicate and ping other Devices with wonderful chat Interface.


           SOME  FEATURES OF LIVEPROFILE


1) Clear mobile chat - LiveProfile provides a very  lovely background to chat you would kill for..

2) Real Chatting interface like Blackberry Messenger

3) You can share files like you do on Whatapp and Blackberry Messenger, i.e; Videos, Recorded Sounds, Music e.t.c.

4) LiveProfile has Pin just like BBM and other apps, you can share your pin with your friends and chat without restriction... oh, less i forget please recharge your phone. lol


You can visit LiveProfile.com to download this App on your Mobile and feel the groove....

Before the week runs out, i'll get the LiveProfile App installed on my Phone and i'll share my LiveProfile Pin with you all so, we can hook up better. But, please don't forget to like our Facebook Fan Page. http://www.facebook.com/nairotech


Saturday, 4 May 2013

How To Edit Your Blog Easily With The New Blogger Template Editor

The  Latest Blogger  Editor [Template] now have some changes that's quite easier  to use than it used to be.
The images below clearly shows  the template coding from the  numbered & colorful decorated lines displaying different coded snippets. The CSS, JavaScript, HTML -  b:if, include, and various displays.

blogger template, blogger tricks, blogger widgets

From now onwards, editting your template will be stressfree and easier to locate anything easily this    applies to CSS too, that appears in  differentiating rules & selectors.

One useful help with this new and advanced template are number which displays just in front of every of template code,  we'll be able to easily locate & change mistakes of different types.

How To Use The New Blogger Template HTML Editor

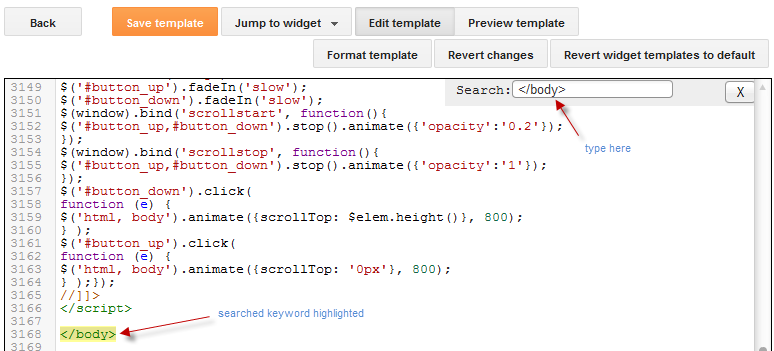
If you are about to search or locate  a tag just in your HTML Editor, just  click inside your Editor & tap the search key on your PC and then enter what you'll like to locate anything in your Template Editor.


Now,  just tap the enter on your PC & it should take you directly to the tag you requested.

Maybe, you may like to be redirected to the point of tag that is for a  widget,  you can just click  "JUMP TO WIDGET" bar of your template  editor and select the html's tag using the list & you will be redirected to that section of code.


You can see from below how the CSS is shown in a folded format


Just Another lovely function is the ability to "Preview Template" without leaving the template page & we can go back with ease to modify our template to our taste.
Lastly, Format template can help re-order the code.


With this little Tip, we can now easy use the Newly Advanced Blogger Template with ease and no qualms at all. You can also check out; How to apply Google+ commenting system to Our Blog.
Enjoy!


HOW TO GET YOUR FORGOTTEN PC PASSWORD EASILY

Active-Password Changer is  a software developed for changing or resetting Computer local admin and user password in lieu of a missing Administrator's ­ password  or where a password can't be recalled. So many even  Format / Re-install  PC to regain their system. Using
Active-Password Changer you won't have have to worry about a thing, but before we continue i'll like you to also check our previous tutorial: HOW TO MAKE YOUR WINDOWS 7 GENUINE EASILY
   

HOW TO RECOVER YOUR LOST/FORGOTTEN PC PASSWORD EASILY
HOW TO MAKE YOUR WINDOWS 7 GENUINE EASILY

Read more at: http://www.nairotech.com/
Copyright © Nairotech
HOW TO MAKE YOUR WINDOWS 7 GENUINE EASILY

Read more at: http://www.nairotech.com/
Copyright © Nairotech

Using Active-Password Changer one can use the login feature as  user with a blank password whenever you've lostyour Computer Password.

You can Download Active@ Password Changer Here [10.4 MB]

 See The Features of Active@ Password Changer :

→  Helps Recovers passwords from various sections & hard diskdrives

→ Help  Displays and Detects all Microsoft Security Databases

→ Help Displays all users

→ Shows full information for all user

→  Help Resets administrator's ­/Users password


→ Also Disables  Smart Login Card  Feature

→ This software Can work on bootable floppy, USB Flash


Windows Disk Creator lets you get bootable disks  using various formats


→ It aids large hard drives 

→ It Supports  SATA ATA

Hope this helps!


Friday, 3 May 2013

WINDOWS 7 - HOW TO MAKE IT GENUINE

Checking the Nigerian statistics we will find that it's quite difficult to see someone  with a windows 7 that is Genuine and we know quit well that  the cost  of a buying  windows 7 that is genuine is on a high range, so i find that people prefer using the trial version of a windows 7. Of recent we talked about:
HOW TO EXTRACT TEXTS FROM IMAGES WITH MS OFFICE ONENOTE  so, make sure check out that tutorial too to know how to extract/retrieve text from any image of your choice. Ok, back to the matter.....

HOW TO EXTRACT TEXTS FROM IMAGES WITH MS OFFICE ONENOTE

HOW TO EXTRACT TEXTS FROM IMAGES WITH MS OFFICE ONENOTE

Read more at: http://www.nairotech.com/
Copyright © Nairotech
HOW TO EXTRACT TEXTS FROM IMAGES WITH MS OFFICE ONENOTE

Read more at: http://www.nairotech.com/
Copyright © Nairotech

 WINDOWS 7 - HOW TO MAKE IT GENUINE
Add caption


Somany users of windows 7 categorically have  experienced error messages saying: Windows 7 is not Genuine.  The error info displays if  likely you use a pirated version

Using windows 7 is currently not genuine that why we have decided to come come up with this vital tutorial on nairotech, though windows 8 is currently available. so, we'll be posting stuffs and tutorials on windows 8 anytime soon.

Ok, this Tutorual will teach you how you can make your windows 7 genuine using command prompt.

HOW TO MAKE WINDOWS 7 GENUINE USING COMMAND PROMPT:


→  Click windows button and R "
 → A  box will show up , In the "run" box that displays type CMD, then Press OK

N/B: "CMD" should be run as  an Administrator a  prompt will show-up, just type SLMGR -REARM and then Hit the Enter button.

ACTIVATE YOUR WINDOWS 7 INTO A GENUINE VERSION WITHOUT SOFTWARE

Now, Wait 7-12 seconds  and Link image below will show up.

ACTIVATE YOUR WINDOWS 7 INTO A GENUINE VERSION WITHOUT SOFTWARE

Bravoo!!! You can now Restart your computer now to see the effect live.....  No more complaints again...

Enjoy your PC now...

Please, always use the comment Box and the share buttons, who knows your friends on Facebook, Twitter and Google+ might need this Tutorial too..


HOW TO EXTRACT TEXTS FROM IMAGES WITH MS OFFICE ONENOTE


 Today, we bring to you a lovely tutorial to start your day. In Nairotech Blog we always bring the best tutorials to make make our subscribers/ Readers happy thats why its called an Informative Blog. Please, if you haven't subscribed yet to our Facebook Fan Page, please do that Here. So, we'll Learn How to Extract Text from any Image/Picture.

For instance, anytime we require an  information in text format from pictures, we are always forced to type the words which usually takes time to type.  So, instead of having to go through this process we can use: Optical Character Recognition (OCR) Software to retrieve the text from the image.

HOW TO EXTRACT TEXTS FROM IMAGES WITH MS OFFICE ONENOTE

Optical Character Recognition can recognize Handwritten , Typewritten or  Printed Text  & Convert the text to Editable  Text Structure. Though, the result might not be that accurate & that's why you'll need to edit some words. I think is better to edit some words instead of having to type the whole document.

Extracting the Text from the picture you  can make use of some Online Optical Character Recognition softwares but let me show you an easy way to do that; You will need MS office in you PC, we will make use of ''Microsoft office Onenote'' to retrieve allthe text from various images.

      
              HOW TO RETRIEVE TEXTS WITH MS OFFICE ONENOTE:

→ START >> All Programs >> MS office >> Microsoft Office Onenote.

→ Just Copy and paste the image in the Ms office Onenote where you want to retrieve your text.

→  Then, Right Click On the Picture & seSect " Copy Text From Image"

→  Open Notepad or Word from your Computer & paste the retrieved Content.

→ Finally, you can edit the Spelling errors.

Don't forget to leave your comments and share this post using the social share links. Thanks!       


Monday, 29 April 2013

How To Apply Google Plus Commenting System On Your Blog


Google+ just introduced a new commenting system which Google has introduced that integrates Google+ comments with Blogs. The new system of commenting is an added advantage to the default Blogger system of commenting, & it aids threaded comments too. It's appearance is better. Some of my friends requested via Mail that i post something on this system of commenting. I am putting up this compiled short post tutorial on how to easily install and use this new advanced commenting system.


                                  Moving to Google Plus comments:

To implement Google Plus comments for your Blog, first you have to connect your account to your Google+ account. Just follow these steps.


Login into your Blogger dashboard, and choose your blog you want to connect

Click on the Google+ button from the left sidebar of your Blog

Then, Click on the Get Started button on the top-left side to connect your blog account. This will not appear if your account is already merged.

Follow the simple instructions to connect your blog.

Once you are connected, you will get an option to Use Google+ comments on your blog.

Ticking this will enable the new Google Plus commenting system.

This will automatically change your Google Plus comments on for default templates.

But note it will likely not work for custom blogger templates. So, you will have to change your template code and change some lines as directed in the section below.

                   How To Display Google comments on Custom Blogger Templates

You can Revert to default option>>

Custom templates have configured customed widgets that usually override the default settings. And that is why this commenting system might not easily work with custom templates.

To achieve this, you can revert your Blog Widget to defaults in your template HTML editor via the following steps.


From inside your blog's dashboard, click on Template from the left sidebar.

Click on Edit HTML on your Blog

Then, Click on the Revert Widget templates to defaults button

It will reset other widgets to default as well.

Hope It Helps!